Thursday, 12 November 2009

how to create a realistically textured skybox using an image of the sky, the offset filter in photoshop, and 3DS max


i aquired an image of the sky and loaded it into photoshop. (image 01)


i then used free transform to make the image 512x512 pixals. (image 02).


After this i used the offset modifyer to make all the edges of the image meet (image 03).


after this i used the stamp clone tool to make all the bits in the middle fit, i had to use the offset filter a few times to make sure everything was smooth.


then i applied the image to a sphere with a normal modifyer which makes the textures visable from within the sphere. (image 04)


image 05 is a final render of my product, which has some simple flat land, and a big yellow sun.


i then took a camera and took some pictures of the sky (image 06).


i then applied the previous steps to the image featured in image 06, to make image 07 which is another render.

Thursday, 8 October 2009

Textureing a box modelled house, using the unwrap uvw map modifier, in 3DS max.


I attempted to unwrap a uvw map, of a box model, using the unwrap UVW modifier.


The first thing i did was created a simple house out of a box, using the editable mesh modifier (see image 1).


The next thing i did was add a unwrap UVW modifier, (see image 02) so i could arrange each individial polygon into a topdown view, this can then be exported as an image, either by rendering or printscreening, and then edited in photoshop. (see image 03)


in photoshop i added textures for all the walls and the roof.


i then saved the map as a .jpeg, and used it in 3ds max to texture my house. (see image 04).


as a finishing touch i rendered the house in a pretty meadow, to make it look profesional. (image 05).

Thursday, 24 September 2009

3ds max terrain


I created a 3d island using max, and photoshop.


first i created a displacement map using photoshop and saved it as a .JPEG (see image 01)
and in 3ds max added displacement modifier to a plane, which when combined with the image created some hieght in certain parts of the map (see image 02).


then i created a texture using photoshop (see image 03) and applied the texture to the model, then i added some enviromental effects such as sun, sky and some water and lighting effects.


this is the finished result (image 04).

Tuesday, 30 June 2009

unit 67 evaluation question 11


Are you happy with the overall product?

I have a lot to say about the little things in the product, there are severe problems with the colouring and a terrible boarded which makes it look messy close up, however when looking at the entire thing as a whole it looks quite good, its still incredibly colourful, and tells the story very well.

I think that one of the main problems I had with this storyboard was that I expected to much from it, its not a work of art and its not suppose to be realistic, it looks pretty and it tells a story, and that’s all it needs to do.

So I am extremely happy with the overall product.

unit 67 evaluation question 10

If you had the opportunity to make this product again would you do anything different?

If I was to create this product again I would keep much of the style the same, I would however completely change the level of detail, I would add a lot less filter effects and spend more time making the drawings look bright and colourful, one of the main problems I had with the making of the storyboard was that I didn’t spend enough time making the original images look good on their own.

I would spend I lot more time making the images look extremely vibrant and real as pencil drawings, so that the Photoshop filter effects would not need to be relied on as much.

unit 67 evaluation question 8 & 9

Deadline

I was slightly behind the deadline when making the storyboard. This was due to poor time management, despite this however I did get it In eventually, and it was a higher quality product because of the extra time spent working on it.

Time management

Time management was poor, I spent too much time working on other things before the deadline, which meant that I missed the deadline altogether. I also spent too much time not working when I was at home which resulted in me missing the deadline.
In future I will spend more time working on time management.


unit 67 evaluation question 7


What skills have been developed throughout this process?

Throughout the creation of this storyboard, I learned a fair bit about how to use Photoshop and how to create vibrant and colourful images using effects and using layers effectively.

Towards the start of the making of this storyboard I would not have bothered using layers as much, and I did not see the point of them, I learnt throughout the making of this storyboard however that they are incredibly useful, for example making copies of layers is an excellent way to go back after making silly mistakes, layers are also a good way to apply filter effects or select parts of an image because only the image in the selected layer would be selected.

Other than this however I would have to say I have learnt very little and would like to practise more with Photoshop before doing this again.

unit 67 evaluation question 6

Did you encounter any problems when creating the product? If so how were they resolved?

One of the main problems I would have to note regarding the creation of the storyboard would be my severe lack of Photoshop skills which lead me to having to resort to using countless amounts of filter effects to cover up my bad Photoshop skills, one filter I used often was the bas relief filter which adds a smooth gradient between two colours giving the illusion of light. I also used the film grain filter for carpeting, however all these effects just make the storyboard look repetitive and bland, instead of looking vibrant and realistic, this was a major problem which I was incapable of resolving, meaning that overall I am unhappy with the final product and I believe I could have done better.

unit 67 evaluation question 5

Content/style of my work

I have many criticisms towards to content and style of my own work one of the main problems I have with my work is a lot of the minor details which I left out for example I left a lot of the characters skin colours completely one colour when I could have added a variation in colour or simple a texture or some lighting effects to make it appear more realistic.

There are also irregularities with the backgrounds, for instance with frame 6 the buttons on the wall are inconsistent with the same buttons in frame 8, this makes the storyboard look unprofessional and messy, another thing I would have to note is the black boarders around each frame are incredibly inconsistent, for example the border around frame 1 is very thin, while the border around frame 7 is incredibly thick, the border also overlaps the image, and leaves unsightly white patches everywhere.

Despite the content problems the style of the storyboard is cartoony and colourful, as well as being consistent throughout the storyboard.

unit 67 evaluation question 4

Discuss the aesthetic aspects of your work and highlight the strengths / areas to develop

I created my storyboard to an extremely bright and colourful style which would compliment the happy and child friendly character and style of the game.

In a similar way to the technical aspects I would like to improve a lot of the storyboard creatively.

Despite the colours and style suiting the storyboard very well, there are many problems which could be fixed with more work, such as the level of detail is not very high, despite the storyboard having a very colourful and bright style, this is no excuse for it being too simplified, also the storyboard in general looks rather dull, and unpolished and could use a thicker and more consistent border between each panel in order to make it look more professional and generally easier to look at.

unit 67 evaluation question 3

Discuss the technical aspects of your work and highlight the strengths / areas to develop

From a ability point of view I am confident and quite experienced with Photoshop, however, I was unsure in a lot of areas when creating this of how to create the effects I wanted, so in many ways my end product is sub standard, so If I was to redo my storyboard, or go back and improve it I would use a lot more effects with lighting, and colour, I would change the opacity in a lot of places, to create cool transparent effects, and I would generally smooth everything over making it appear a lot smoother and easier to look at, I need to improve my Photoshop skills a fair bit.

unit 67 evaluation question 2

Is the end product appropriate for your intended audience?

I wanted to children to be my target market, due to the colourful nature of my characters, and the extremely simplified plot, however I did not want to alienate the adult market at the same time, so I went for an extremely simple, and colourful design, however I included a straight forward, and compelling plot, this is so that the end product will be suitable for children yet targeted towards all age groups.

The end rating I agreed upon was PEGI 3+; meaning almost anyone would be allowed to play.

Unit 67 evaluation question 1


Does the end product match your original intentions?

Originally I wanted my product to be an extremely simple and bold storyboard which clearly explains what the story is and provides sufficient information relating to the story and plot.

My end product went more or less to plan; the end result was not quite as polished as I wanted, and due to my limited Photoshop abilities I couldn’t do some of the effects I wanted, however in the end I did create a descent end product and I am pleased with what I have.


Thursday, 25 June 2009

3D animation reflecting upon work

3D animation reflecting upon work

My original intentions for my 3D animation work were for my animation work to be of an acceptable standard, and to successfully apply sufficient techniques to achieve this work standard.

For example in the ball going downstairs animation, to apply my skills in key framing and using simple modelling in order to create this animation, this animation in particular however took very little planning, this animation was done as a group task, so the animation I created is to the same standards and in some ways identical as other peoples.

As for my modelling techniques, I wanted to be able to confidently model detailed characters and scenery, using techniques such as texture mapping and polygon modification, my first attempt at character modelling was thingymagic.max , which was a character not of my own design which in a similar fashion to the ballgoingthethestairs.max animation was done by the rest of the group, I believe that I completed this model successfully, and applied some simple yet effective techniques to create a model to a adequate standard.

Another model of mine was supershotgunman.max, which was a character made to made own design and modelled myself, this model was not created in lesson and was done in my own free time, which allowed me to create it to a higher standard than thingymagic.max.

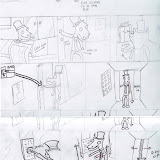
For the designing of this model I created some simple concept art in the form of some pencil drawings, and also a drawing which contained a front and side view which I used to create a T-pose of my character.

Before in some of my previous character designs I failed to line up the characters proportions correctly, making it incredibly difficult to create when in 3D max, meaning that I had to go back and re draw the t-pose in order to create my character.

When creating this character in particular I gained a lot of ability through modelling, and designing meaning this character had a much higher polygon count, and in general looked a lot less blocky and a lot more lifelike.

One thing I would like to comment on is the aesthetic style of my work, I would have to say that technical aspects aside my work looks rather dull, I took no care in making any of it look pleasing, and I generally have dull colours, and boring character designs.

Despite this I did follow the principles of animation and my animations do look realistic, and smooth.

If I was to redo all of my work I would take a lot of precisions and take more time in designing, one problem I had when doing a lot of my work was my general lack of direction in the creation, which had further problems later on, for example with the supershotgunman.max model I had a lot of trouble with rigging due to its slightly irregular and ill design.

Also I would apply I lot of the skills I have learnt such as adding more detailed textures, and having a higher polygon overall, some of my models which appeared slightly blocky would have more polygons and would therefore appear smoother and generally more lifelike.

With the subject of time management and deadlines I would have to say I have not been the best, I had problems managing my time due to poor management, and I believe I missed a lot of my deadlines, this would be a thing to improve upon, and I have learnt a lot about keeping to deadlines throughout the course of my work, and would if I was to redo it work to a quicker pace when a deadline is arriving in order to reach it.


Overall I have mixed feelings about my work in general, while I am pleased with the standard of some of my work; I believe I could have done a lot better with a lot of it, often making silly mistakes early on which resulted in substandard models, which would be to standard if I had taken more care in design early on


Tuesday, 23 June 2009

unit 67 album
this is an album containing my unit 67 drawings.

UNIT 18 EVALUATION

  • For unit 18 we have had to research, design and create some icons for the apple iphone.
  • To start with I had to do some research on the apple company throughout this I had to look at apples many products including the iMac personal home computer, and the Ipod mp3 player. As well as this I had to gather information on apples history, about its founders, and all the products apple had made in the past.
    To go with the apple research I had to research Icons and symbols, in order to understand what certain symbols mean, and how these can be implemented into my final design.
  • In order to fully understand the iPhone I had to research some of its main competitors, including the t-mobile HTC G1 (Google phone), and the blackberry
  • As for the actual design I had to create a collage showing my 5 themes which were fantasy, humour, sci fi, war, and horror, the college (image 1), consists of many images related to their themes. produce some images based on 5 simple themes, fantasy, humour, sci fi, war, and horror, I presented each theme on a A3 sheet of paper, and then made an additional A3 piece which contains a final draft of each individual theme.
    The purpose of these were so that I could understand and show roughly what my icons will look like.
  • I then had to create a final icon for each individual theme on Adobe Photoshop I drew my images out on paper and scanned them into Photoshop, and then edited them.
  • As well as the apple Iphone I had to do various amounts of research on other smart phones such as the blackberry, and the t-mobile Google phone.
  • Throughout the making of my icons I did not learn anything in the way of Photoshop skills, however it was good to put the skills that I already had acquired into practise in a practical fashion.
    If I was to create these icons again I would take more care when drawing my icons, because one of my original intentions was to make the icons extremely smooth and shiny, however this was impossible to do with my current Photoshop skills, and the state of the original drawings.